ルートガードを実装する方法を忘れないためにメモ。
ページを表示する前に簡易的なチェックをするだけであればCanActivateインタフェースを実装してブール値を返せばよい。
TOC
CanActivate – 特定のパスに遷移する前にチェックを行う
手順概要
- guardを作成する
- ページ遷移前にチェックするロジックをコーディングする。
- ガードをルートに設定する。
手順詳細
ルートされたあとに表示するコンポーネントも作成しておきます。
ng g c ok --skip-tests
ng g c ng --skip-tests
Guardを作成します。
> ng g guard canactivate --skip-tests
? Which interfaces would you like to implement? CanActivate
CREATE src/app/canactivate.guard.ts (464 bytes)上記コマンドで作成された初期状態は以下の通りだと思います。必ずtrueを返すようになっています。
export class CanactivateGuard implements CanActivate {
  canActivate(
    route: ActivatedRouteSnapshot,
    state: RouterStateSnapshot): Observable<boolean | UrlTree> | Promise<boolean | UrlTree> | boolean | UrlTree {
    return true;
  }
}ここを「10回に1回の割合でfalseを返す」に変更します。
export class CanactivateGuard implements CanActivate {
  canActivate(
    route: ActivatedRouteSnapshot,
    state: RouterStateSnapshot): Observable<boolean | UrlTree> | Promise<boolean | UrlTree> | boolean | UrlTree {
    if (Math.random() > 0.9) {
      return false;
    }
    return true;
  }
}
続いて、ガードをルートに追加します。
import { NgModule } from '@angular/core';
import { RouterModule, Routes } from '@angular/router';
import { CanactivateGuard } from './canactivate.guard';
import { OkComponent } from './ok/ok.component';

const routes: Routes = [
  {
    path: '',
    component: OkComponent,
    canActivate: [CanactivateGuard]
  }
];

@NgModule({
  imports: [RouterModule.forRoot(routes)],
  exports: [RouterModule]
})
export class AppRoutingModule { }
ちなみに、ルーティングされたページが表示されるよう<router-outlet>をapp.component.html書いておきます。
<router-outlet></router-outlet>これによって、10回に9回以下のページが表示されて、10回に1回まっさらなページが表示されるはずです。

ちなみに、真っ白なページではなく別のルートに飛ばしたい場合は、下記のように設定できます。
export class CanactivateGuard implements CanActivate {
  constructor(private router: Router){}
  canActivate(
    route: ActivatedRouteSnapshot,
    state: RouterStateSnapshot): Observable<boolean | UrlTree> | Promise<boolean | UrlTree> | boolean | UrlTree {
    if (Math.random() > 0.9) {
      this.router.navigate(['ng'])
      return false;
    }
    return true;
  }
}
それに合わせて、ngというルートを作成します。
import { NgModule } from '@angular/core';
import { RouterModule, Routes } from '@angular/router';
import { CanactivateGuard } from './canactivate.guard';
import { NgComponent } from './ng/ng.component';
import { OkComponent } from './ok/ok.component';

const routes: Routes = [
  {
    path: '',
    component: OkComponent,
    canActivate: [CanactivateGuard]
  },
  {
    path: 'ng',
    component: NgComponent
  }
];

@NgModule({
  imports: [RouterModule.forRoot(routes)],
  exports: [RouterModule]
})
export class AppRoutingModule { }
これで、10回に1回程度、ngというページへ遷移されるようになったとおもいます。これを利用して、ログインしてない場合には、ログインページに飛ばすといったようなロジックを作成できます。
CanActivateChild – 特定のパスに設定されたChildrenに遷移する前にチェックを行う
手順の概要は同じなので再掲です。
手順概要
- guardを作成する
- ページ遷移前にチェックするロジックをコーディングする。
- ガードをルートに設定する。
手順詳細
ルートされたあとに表示するコンポーネントも作成しておきます。
ng g c ok --skip-tests
ng g c ng --skip-tests
Guardを作成します。
> ng g guard canactivatechild --skip-tests
? Which interfaces would you like to implement? CanActivateChild
CREATE src/app/canactivatechild.guard.ts (489 bytes)上記コマンドで作成された初期状態は以下の通りだと思います。必ずtrueを返すようになっています。
export class CanactivatechildGuard implements CanActivate {
  canActivate(
    route: ActivatedRouteSnapshot,
    state: RouterStateSnapshot): Observable<boolean | UrlTree> | Promise<boolean | UrlTree> | boolean | UrlTree {
    return true;
  }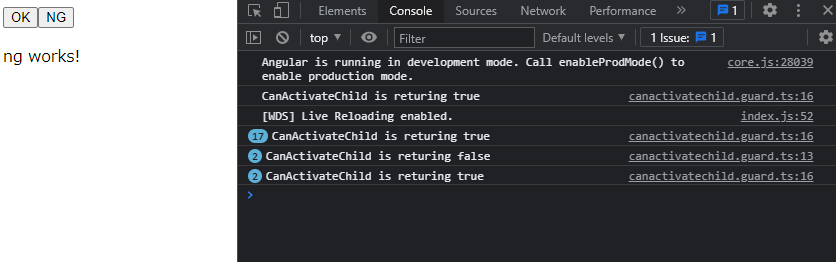
}同様に「10回に1回の割合でfalseを返す」に変更します。また、コンソールに本関数が呼ばれてるかどうか確認のためのログを出します。
export class CanactivatechildGuard implements CanActivateChild {
  canActivateChild(
    route: ActivatedRouteSnapshot,
    state: RouterStateSnapshot): Observable<boolean | UrlTree> | Promise<boolean | UrlTree> | boolean | UrlTree {
    if (Math.random() > 0.9) {
      console.log("CanActivateChild is returing false")
      return false;
      }
    console.log("CanActivateChild is returing true")
    return true;
  }
}続いて、ガードをルートに追加します。今回は、children内に複数のパスを定義してその間で遷移した場合に、canActivateChildに指定されたガードが呼ばれているか見ていきます。
import { NgModule } from '@angular/core';
import { RouterModule, Routes } from '@angular/router';
import { CanactivatechildGuard } from './canactivatechild.guard';
import { NgComponent } from './ng/ng.component';
import { OkComponent } from './ok/ok.component';

const routes: Routes = [
  {
    path: '',
    canActivateChild: [CanactivatechildGuard],
    children: [
      {
        path: 'ok',
        component: OkComponent
      },
      {
        path: 'ng',
        component: NgComponent
      }
    ]
  }
];

@NgModule({
  imports: [RouterModule.forRoot(routes)],
  exports: [RouterModule]
})
export class AppRoutingModule { }そこで、ページ遷移のためのボタンとルーティングされたページが表示されるようapp.component.htmlを変更します。
<button [routerLink]="['/ok']">OK</button>
<button [routerLink]="['/ng']">NG</button>
<router-outlet></router-outlet>これによって、OKとNGのボタンを押して行き来する際にcanActivateChildに指定されたガードが呼ばれていることが確認できます。