フォームに入力した内容をAngular Materialのテーブルに追加する動作を実装します。
- Angular Materialのテーブルのデータモデルを作成
- フォームに入力された内容をテーブルに追加
 Angular Reactive Forms その5 フォームの内容を別のフォームにコピー
各種バージョンは以下のとおりです。
- Angular CLI: 11.2.8
- Node: 15.10.0
- Angular Material: 11.2.8
TOC
今回の目標とソースコードについて
今回の目標です。
- Angular Materialのテーブルに情報を表示
- フォームの内容をテーブルの情報として追加
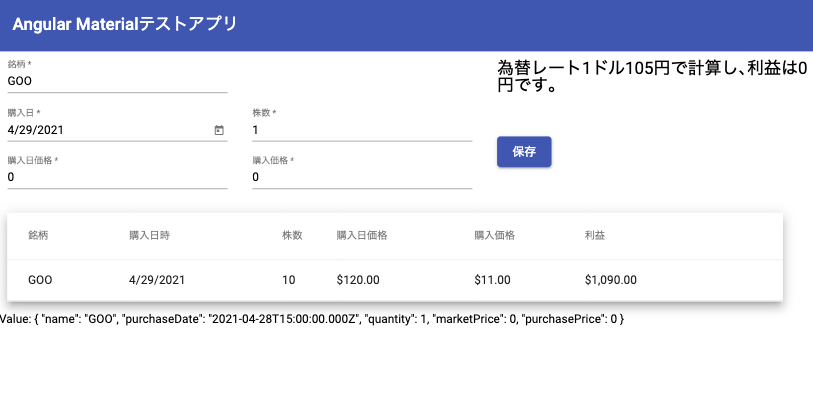
これまでは、公式からコピーした状態だったので、全くアプリケーションと関係ない情報が表示されていました。今回で、アプリケーション用のデータモデルを作成しテーブルに表示できるようにします。最終的なアプリケーションのイメージは以下のとおりです。
Angular Materialのテーブルに情報を表示
まずは、Angular Materialのテーブルに使用するデータモデルを作成します。
export interface EsppData {
  name: string;
  purchaseDate: number;
  quantity: number;
  marketPrice: number;
  purchasePrice: number;
  profit: number;
}
基本的にはフォームと一緒です。異なる点は、profit(利益)という新しい変数がある点です。保存ボタンが押された際に、利益を計算して値を格納することを想定しています。
続いて、テスト用の初期データとテーブルの表示部分を実装します。
import { MatTableDataSource } from "@angular/material/table";

export class MainComponent implements OnInit, OnDestroy {
  esppDataList: EsppData[] = [];
  dataSource: MatTableDataSource<EsppData>;
  displayedColumns: string[] = [
    "name",
    "purchaseDate",
    "quantity",
    "marketPrice",
    "purchasePrice",
    "profit",
  ];

  constructor(private fb: FormBuilder) {
    this.esppDataList.push({
      name: "GOOGL",
      purchaseDate: 0,
      quantity: 10,
      marketPrice: 120,
      purchasePrice: 100,
      profit: (120 - 100) * 10,
    });
    this.dataSource = new MatTableDataSource<EsppData>(this.esppDataList);
  }
}
変更点は以下のとおりです。
esppDataListという名前のテーブルのデータ用変数を用意dataSource: MatTableDataSource<EsppData>;で、実際のテーブルデータを作成。MatTableDataSourceは必須ではありません。ただし、フィルタリング、ソート、ページネーションを検討している場合には、使うことをおすすめします。displayedColumnsはテーブルに表示される列を指定しています。this.esppDataList.push()にて、テスト用データを入れています。this.dataSource = new MatTableDataSource<EsppData>(this.esppDataList);にてテーブルに情報をセットしています。
これにより、コンポーネント内でデータモデルの実装ができました。続いて、表示にあたるhtmlのコードを追加していきます。
    <table mat-table [dataSource]="dataSource" class="mat-elevation-z8 result-table">
      <!--- Note that these columns can be defined in any order.
          The actual rendered columns are set as a property on the row definition" -->

      <!-- Name Column -->
      <ng-container matColumnDef="name">
        <th mat-header-cell *matHeaderCellDef>銘柄</th>
        <td mat-cell *matCellDef="let element">{{ element.name }}</td>
      </ng-container>

      <!-- PurchaseDate Column -->
      <ng-container matColumnDef="purchaseDate">
        <th mat-header-cell *matHeaderCellDef>購入日時</th>
        <td mat-cell *matCellDef="let element">{{ element.purchaseDate | date:"M/d/yyyy"}}</td>
      </ng-container>

      <!-- Quantity Column -->
      <ng-container matColumnDef="quantity">
        <th mat-header-cell *matHeaderCellDef>株数</th>
        <td mat-cell *matCellDef="let element">{{ element.quantity }}</td>
      </ng-container>

      <!-- MarketPrice Column -->
      <ng-container matColumnDef="marketPrice">
        <th mat-header-cell *matHeaderCellDef>購入日価格</th>
        <td mat-cell *matCellDef="let element">{{ element.marketPrice | currency}}</td>
      </ng-container>

      <!-- PurchasePrice Column -->
      <ng-container matColumnDef="purchasePrice">
        <th mat-header-cell *matHeaderCellDef>購入価格</th>
        <td mat-cell *matCellDef="let element">{{ element.purchasePrice | currency}}</td>
      </ng-container>

      <!-- Profit Column -->
      <ng-container matColumnDef="profit">
        <th mat-header-cell *matHeaderCellDef>利益</th>
        <td mat-cell *matCellDef="let element">{{ element.profit | currency}}</td>
      </ng-container>

      <tr mat-header-row *matHeaderRowDef="displayedColumns"></tr>
      <tr mat-row *matRowDef="let row; columns: displayedColumns"></tr>
    </table>
変更点は以下のとおりです。
- 表示させたい列ごとに
ng-containerを作成し、その中で列の名前とデータモデルの変数名を指定しています。matColumnDefでdisplayedColumnsから列の名前、td内でデータの変数をelement.profitのように指定しています。 - 購入日時、購入日価格、購入価格、利益はパイプを使って、見た目をそれらしくさせています。ちなみに、日本円で表示する場合には、
{{ val | currency: "JPY":"¥":"0.0-0" }}とします。
ここまで実装すると下記のようにテストデータが表示されるようになったかと思います。
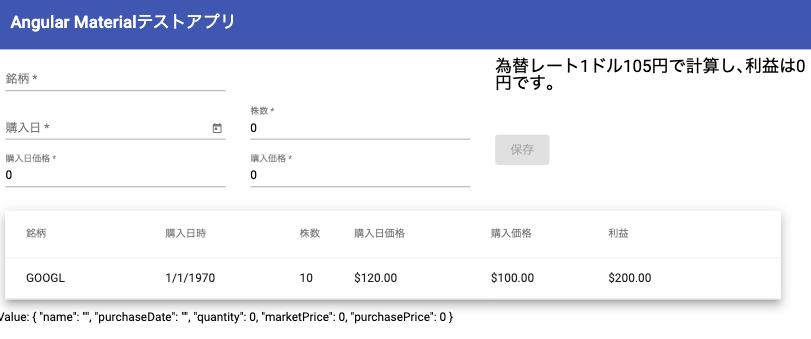
Angular Material Table データの追加
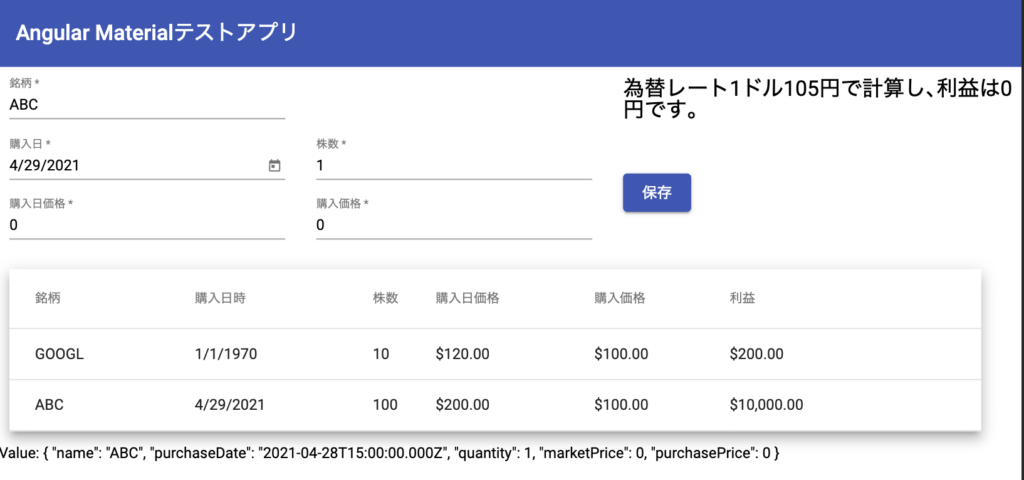
テーブルの表示までできたので、実際にデータを追加するコードを実装します。具体的には、保存ボタンを押すとフォームの内容がテーブルの情報として表示されるようにします。save()が保存ボタンを押すと呼ばれるので、そこで情報の追加とテーブルの表示を更新します。
export class MainComponent implements OnInit, OnDestroy {

  save(): void {
    const name = this.esppForm.get("name")?.value || "";
    const purchaseDate = this.esppForm.get("purchaseDate")?.value || 0;
    const quantity = this.esppForm.get("quantity")?.value || 0;
    const marketPrice = this.esppForm.get("marketPrice")?.value || 0;
    const purchasePrice = this.esppForm.get("purchasePrice")?.value || 0;
    this.esppDataList.push({
      name: name,
      purchaseDate: purchaseDate,
      quantity: quantity,
      marketPrice: marketPrice,
      purchasePrice: purchasePrice,
      profit: (marketPrice - purchasePrice) * quantity,
    });

    this.dataSource = new MatTableDataSource<EsppData>(this.esppDataList);
  }
}
変更点は以下のとおりです。
- データを格納する変数
esppDataListに新しいデータを追加 this.dataSource = new MatTableDataSource<EsppData>(this.esppDataList);で新しいデータを表示
これにより、フォームで入力したデータがテーブルに追加されるようになります。
変更点とまとめ
今回アプリケーションに加えた変更点は以下のとおりです。
- 公式の例にあったモデルの削除
- Angular Materialのテーブルのデータモデルを作成
- データモデルに合わせたテーブル表示
- 保存ボタンにより、データの追加
main.component.tsの変更点は以下のとおりです。
--- a/src/app/main/main.component.ts
+++ b/src/app/main/main.component.ts
@@ -7,29 +7,19 @@ import {
   ValidatorFn,
   Validators,
 } from "@angular/forms";
+import { MatTableDataSource } from "@angular/material/table";
 import { Subscription } from "rxjs";
 import { debounceTime } from "rxjs/operators";

-export interface PeriodicElement {
+export interface EsppData {
   name: string;
-  position: number;
-  weight: number;
-  symbol: string;
+  purchaseDate: number;
+  quantity: number;
+  marketPrice: number;
+  purchasePrice: number;
+  profit: number;
 }

-const ELEMENT_DATA: PeriodicElement[] = [
-  { position: 1, name: "Hydrogen", weight: 1.0079, symbol: "H" },
-  { position: 2, name: "Helium", weight: 4.0026, symbol: "He" },
-  { position: 3, name: "Lithium", weight: 6.941, symbol: "Li" },
-  { position: 4, name: "Beryllium", weight: 9.0122, symbol: "Be" },
-  { position: 5, name: "Boron", weight: 10.811, symbol: "B" },
-  { position: 6, name: "Carbon", weight: 12.0107, symbol: "C" },
-  { position: 7, name: "Nitrogen", weight: 14.0067, symbol: "N" },
-  { position: 8, name: "Oxygen", weight: 15.9994, symbol: "O" },
-  { position: 9, name: "Fluorine", weight: 18.9984, symbol: "F" },
-  { position: 10, name: "Neon", weight: 20.1797, symbol: "Ne" },
-];
-
 function IntegerValidation(min: number): ValidatorFn {
   return (c: AbstractControl): { [key: string]: any } | null => {
     if (parseFloat(c.value) == parseInt(c.value) && !isNaN(c.value) && c.value >= min) {
@@ -48,6 +38,16 @@ export class MainComponent implements OnInit, OnDestroy {
   yen = 0;
   profit = 0;
   esppForm: FormGroup;
+  esppDataList: EsppData[] = [];
+  dataSource: MatTableDataSource<EsppData>;
+  displayedColumns: string[] = [
+    "name",
+    "purchaseDate",
+    "quantity",
+    "marketPrice",
+    "purchasePrice",
+    "profit",
+  ];
   private subscriptions = new Subscription();

@@ -59,11 +59,9 @@ export class MainComponent implements OnInit, OnDestroy {
       marketPrice: [0, [Validators.required, Validators.min(0)]],
       purchasePrice: [0, [Validators.required, Validators.min(0)]],
     });
+    this.dataSource = new MatTableDataSource<EsppData>(this.esppDataList);
   }

-  displayedColumns: string[] = ["position", "name", "weight", "symbol"];
-  dataSource = ELEMENT_DATA;
-
   ngOnInit(): void {
     const quantityControl = this.esppForm.get("quantity");
     if (quantityControl) {
@@ -106,6 +104,17 @@ export class MainComponent implements OnInit, OnDestroy {
   save(): void {
     const name = this.esppForm.get("name")?.value || "";
     const purchaseDate = this.esppForm.get("purchaseDate")?.value || 0;
+    const quantity = this.esppForm.get("quantity")?.value || 0;
+    const marketPrice = this.esppForm.get("marketPrice")?.value || 0;
+    const purchasePrice = this.esppForm.get("purchasePrice")?.value || 0;
+    this.esppDataList.push({
+      name: name,
+      purchaseDate: purchaseDate,
+      quantity: quantity,
+      marketPrice: marketPrice,
+      purchasePrice: purchasePrice,
+      profit: (marketPrice - purchasePrice) * quantity,
+    });

     this.esppForm.reset({
       name: name,
@@ -114,6 +123,8 @@ export class MainComponent implements OnInit, OnDestroy {
       marketPrice: 0,
       purchasePrice: 0,
     });
+
+    this.dataSource = new MatTableDataSource<EsppData>(this.esppDataList);
   }

copyToPurchasePrice(): void {続いて、main.component.htmlの変更点は以下の通りです。
--- a/src/app/main/main.component.html
+++ b/src/app/main/main.component.html
@@ -61,28 +61,41 @@
       <table mat-table [dataSource]="dataSource" class="mat-elevation-z8 result-table">
         <!--- Note that these columns can be defined in any order.
             The actual rendered columns are set as a property on the row definition" -->
-        <!-- Position Column -->
-        <ng-container matColumnDef="position">
-          <th mat-header-cell *matHeaderCellDef>No.</th>
-          <td mat-cell *matCellDef="let element">{{ element.position }}</td>
-        </ng-container>

         <!-- Name Column -->
         <ng-container matColumnDef="name">
-          <th mat-header-cell *matHeaderCellDef>Name</th>
+          <th mat-header-cell *matHeaderCellDef>銘柄</th>
           <td mat-cell *matCellDef="let element">{{ element.name }}</td>
         </ng-container>

-        <!-- Weight Column -->
-        <ng-container matColumnDef="weight">
-          <th mat-header-cell *matHeaderCellDef>Weight</th>
-          <td mat-cell *matCellDef="let element">{{ element.weight }}</td>
+        <!-- PurchaseDate Column -->
+        <ng-container matColumnDef="purchaseDate">
+          <th mat-header-cell *matHeaderCellDef>購入日時</th>
+          <td mat-cell *matCellDef="let element">{{ element.purchaseDate | date:"M/d/yyyy"}}</td>
+        </ng-container>
+
+        <!-- Quantity Column -->
+        <ng-container matColumnDef="quantity">
+          <th mat-header-cell *matHeaderCellDef>株数</th>
+          <td mat-cell *matCellDef="let element">{{ element.quantity }}</td>
+        </ng-container>
+
+        <!-- MarketPrice Column -->
+        <ng-container matColumnDef="marketPrice">
+          <th mat-header-cell *matHeaderCellDef>購入日価格</th>
+          <td mat-cell *matCellDef="let element">{{ element.marketPrice | currency}}</td>
+        </ng-container>
+
+        <!-- PurchasePrice Column -->
+        <ng-container matColumnDef="purchasePrice">
+          <th mat-header-cell *matHeaderCellDef>購入価格</th>
+          <td mat-cell *matCellDef="let element">{{ element.purchasePrice | currency}}</td>
         </ng-container>

-        <!-- Symbol Column -->
-        <ng-container matColumnDef="symbol">
-          <th mat-header-cell *matHeaderCellDef>Symbol</th>
-          <td mat-cell *matCellDef="let element">{{ element.symbol }}</td>
+        <!-- Profit Column -->
+        <ng-container matColumnDef="profit">
+          <th mat-header-cell *matHeaderCellDef>利益</th>
+          <td mat-cell *matCellDef="let element">{{ element.profit | currency}}</td>
         </ng-container>

<tr mat-header-row *matHeaderRowDef="displayedColumns"></tr>これまでで基本的な機能がwebページに実装されました。最初から見ていただければ、Angular Materialコンポーネントの追加方法やReactive Fomrsの基礎部分について理解できたかと思います。アプリケーションの見た目や機能の実装はこちらで終了です。
次回以降で、テストの方法やデプロイ方法について触れていきます。
 Angular Jasmine でテストをかいてみる