オンプレのアプリケーションをSSO化するには一般的に3つの方法があります。
- アプリケーションでSSO用のプロトコルをサポートする(OIDCやSAML)
- ミドルウェアでSSOをサポートする
- リバースプロキシやゲートウェイでSSOをサポートする
基本的にどれが正解というものはないのですが、手っ取り早い方法としてリバプロでSSOを有効化する手法を見ていきたいと思います。
TOC
概要
今回のシステム概要です。
KeyCloakがIDPで、ApacheがSPになります。
想定は、SAMLアサーションの内容をHTTPヘッダーとしてバックエンドのアプリケーションに送信する構成です。
設定
今回はデプロイ先のOSとしてCentOS7を用います。インストール後の基本設定はこの記事でまとめているので、基本設定を確認したい人はこちらを参照してください。
 CentOS7 基本設定
Apacheと必要なパッケージのインストール
yum install httpd mod_auth_mellon mod_ssl openssl今回はSAMLの認証用にauth_mellonモジュールを使用します。また、HTTPSを使用する必要があるので、mod_sslもインストールします。
SELinuxをPermissiveに設定
今回はテスト用なので、SAML用のフォルダがSELinuxでPermission Deniedのエラーがでるので、無効化します。
#
# This file controls the state of SELinux on the system.
# SELINUX= can take one of these three values:
#     enforcing - SELinux security policy is enforced.
#     permissive - SELinux prints warnings instead of enforcing.
#     disabled - No SELinux policy is loaded.
SELINUX=permissive
# SELINUXTYPE= can take one of three values:
#     targeted - Targeted processes are protected,
#     minimum - Modification of targeted policy. Only selected processes are protected.
#     mls - Multi Level Security protection.
SELINUXTYPE=targeted
HTTPSポートの開放
HTTPSのポートで外部からアクセスできるようにファイアウォールでポートを開けます。
firewall-cmd --add-service=https --permanent
firewall-cmd --reload
SAMLの設定
SAML用の設定を入れるディレクトリを作成。
mkdir /etc/httpd/saml2続いて、必要なファイルをスクリプトを使って作成します。
/usr/libexec/mod_auth_mellon/mellon_create_metadata.sh https://saml-proxy.home.lab https://saml-proxy.home.lab/mellon実行すると、下記のようなログがでます。
# /usr/libexec/mod_auth_mellon/mellon_create_metadata.sh https://saml-proxy.home.lab https://saml-proxy.home.lab/mellon
Output files:
Private key:                              https_saml_proxy.home.lab.key
Certificate:                              https_saml_proxy.home.lab.cert
Metadata:                                 https_saml_proxy.home.lab.xml
Host:                                     saml-proxy.home.lab

Endpoints:
SingleLogoutService (SOAP):               https://saml-proxy.home.lab/mellon/logout
SingleLogoutService (HTTP-Redirect):      https://saml-proxy.home.lab/mellon/logout
AssertionConsumerService (HTTP-POST):     https://saml-proxy.home.lab/mellon/postResponse
AssertionConsumerService (HTTP-Artifact): https://saml-proxy.home.lab/mellon/artifactResponse
AssertionConsumerService (PAOS):          https://saml-proxy.home.lab/mellon/paosResponse
作成したファイルを先程のフォルダに移動します。
mv https_saml_proxy.home.lab.key https_saml_proxy.home.lab.cert https_saml_proxy.home.lab.xml /etc/httpd/saml2/続いて、認証用の設定とバックエンド向けのプロキシを設定ファイルに書き込みます。
ServerName saml-proxy.home.lab
MellonCacheSize 100
MellonLockFile "/run/mod_auth_mellon/lock"

<LocationMatch /* >
    # Configuration
    AuthType Mellon
    MellonEndpointPath /mellon/
    MellonSPMetadataFile /etc/httpd/saml2/https_saml_proxy.home.lab.xml
    MellonSPPrivateKeyFile /etc/httpd/saml2/https_saml_proxy.home.lab.key
    MellonSPCertFile /etc/httpd/saml2/https_saml_proxy.home.lab.cert
    MellonIdPMetadataFile /etc/httpd/saml2/idp_metadata.xml

    # Enable Authentication
    MellonEnable auth
    Require valid-user

    # Proxy to backend once authenticated
    ProxyPass        http://192.168.11.204
    ProxyPassReverse http://192.168.11.204

    # Set NAME ID in Remote-User header
    RequestHeader set Remote-User %{MELLON_NAME_ID}e env=MELLON_NAME_ID
</LocationMatch>
まず、auth_mellonの基礎設定を入れます。
- AuthType
- auth_mellonを使うので
Mellonを指定
- auth_mellonを使うので
- MellonEndPointPath
- Single Sign-onのURLなどに使うパスを指定
- MellonSPMetadataFile
- プロキシのメタデータを指定
- MellonSPPrivateKeyFile, MellonSPCertFile
- アサーションの署名に使用する証明書
- MellonIdPMetadataFile
- IDPのメタデータを指定
指定したLocationで認証を有効化する設定
    MellonEnable auth
    Require valid-user
バックエンドの指定
    ProxyPass        http://192.168.11.204
    ProxyPassReverse http://192.168.11.204
Remote-UserのHTTPヘッダーにName IDを入力
RequestHeader set Remote-User %{MELLON_NAME_ID}e env=MELLON_NAME_IDKeyCloakの設定
先程作成したSP側のメタデータを使用してSAMLアプリケーションを作成

次の画面で、任意の名前を入力し、SAMLアサーションの暗号化だけ解除して保存します。
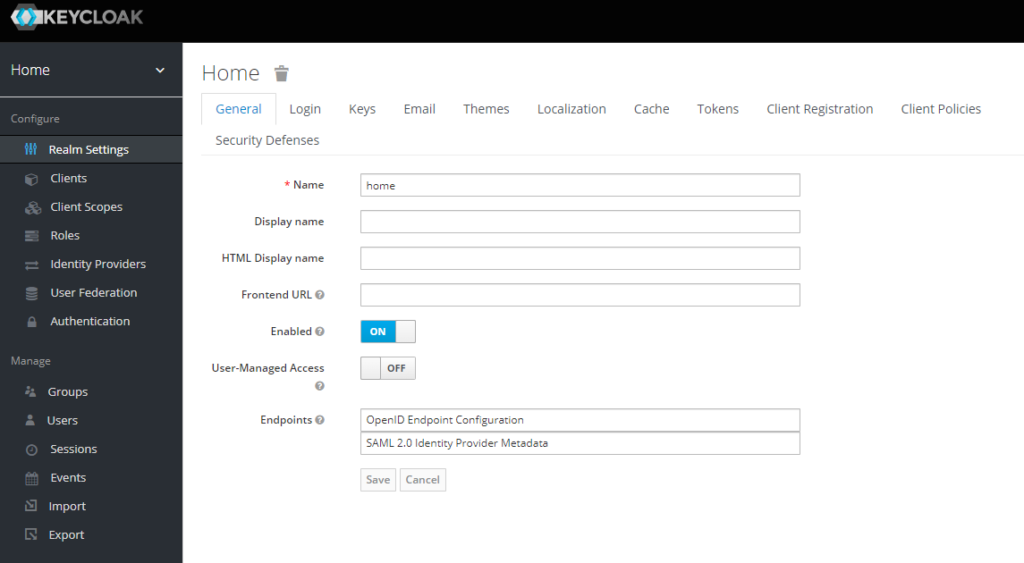
また、IDPのメタデータは下記の画面からEndpointsのとこにあるSAMLをクリックするとダウンロードできるので、先程auth_mellonの設定で指定したフォルダに置きます。

これで必要な設定は完了です。
設定のテストとサービスの起動
apachectl configtest問題がなければ下記のようなログが出ます
# apachectl configtest
Syntax OK
httpdを起動します。
systemctl start httpd状態を確認
systemctl status httpdテスト
プロキシサーバにアクセスします。
認証していない場合には、303でIDPにリダイレクトされます

今回は、KeyCloakのログイン画面です。
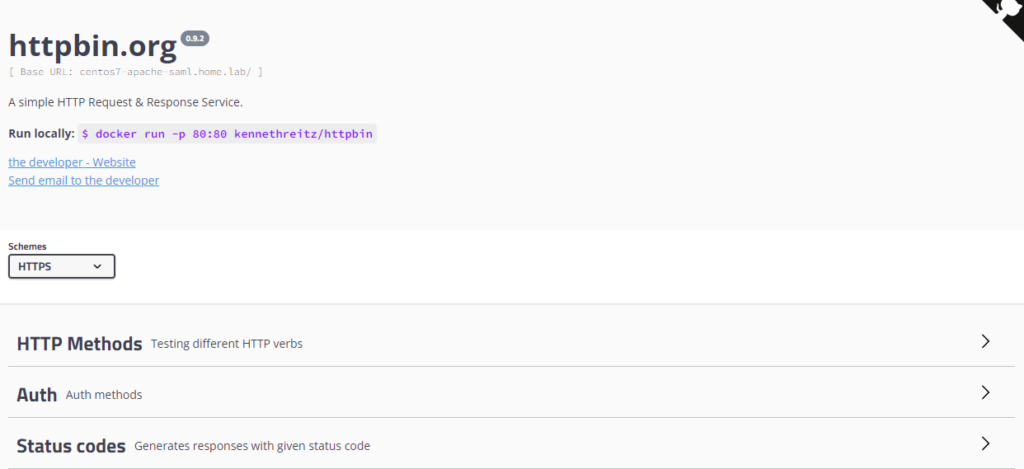
ログインが完了するとバックエンドのサーバに繋がります。今回はhttpbinをバックエンドサーバに使用しています。

送信したHTTPヘッダー見るために、/anythingのパスにアクセスします。
{
  "args": {},
  "data": "",
  "files": {},
  "form": {},
  "headers": {
    "Accept": "text/html,application/xhtml+xml,application/xml;q=0.9,image/avif,image/webp,image/apng,*/*;q=0.8,application/signed-exchange;v=b3;q=0.9",
    "Accept-Encoding": "gzip, deflate, br",
    "Accept-Language": "en-US,en;q=0.9,ja;q=0.8",
    "Connection": "Keep-Alive",
    "Cookie": "mellon-cookie=2974ac105ccf1e9eb34fb2a06803d819",
    "Host": "192.168.11.204",
    "Remote-User": "G-690c0e94-38b1-472a-b091-f4bfbf39fc11",
    "Sec-Ch-Ua": "\" Not A;Brand\";v=\"99\", \"Chromium\";v=\"98\", \"Google Chrome\";v=\"98\"",
    "Sec-Ch-Ua-Mobile": "?0",
    "Sec-Ch-Ua-Platform": "\"Windows\"",
    "Sec-Fetch-Dest": "document",
    "Sec-Fetch-Mode": "navigate",
    "Sec-Fetch-Site": "none",
    "Sec-Fetch-User": "?1",
    "Upgrade-Insecure-Requests": "1",
    "User-Agent": "Mozilla/5.0 (Windows NT 10.0; Win64; x64) AppleWebKit/537.36 (KHTML, like Gecko) Chrome/98.0.4758.102 Safari/537.36",
    "X-Forwarded-Host": "saml-proxy.home.lab",
    "X-Forwarded-Server": "saml-proxy.home.lab"
  },
  "json": null,
  "method": "GET",
  "origin": "192.168.10.101",
  "url": "http://saml-proxy.home.lab/anything"
}レスポンスの中にRemote-Userがあり、Name IDが指定されています。
ちなみに、SAMLのアサーションは以下のもので、Name IDと一致していることがわかります。
<samlp:Response xmlns:samlp="urn:oasis:names:tc:SAML:2.0:protocol"
                xmlns:saml="urn:oasis:names:tc:SAML:2.0:assertion"
                Destination="https://saml-proxy.home.lab/mellon/postResponse"
                ID="ID_39aa56fc-344a-4b3b-9d7e-14bc3cbfd627"
                InResponseTo="_C4D6B0831F8005708787812E9AD9D8C9"
                IssueInstant="2022-02-27T16:34:58.268Z"
                Version="2.0"
                >
    <saml:Issuer>http://192.168.10.54:8080/realms/home</saml:Issuer>
    <dsig:Signature xmlns:dsig="http://www.w3.org/2000/09/xmldsig#">
        <dsig:SignedInfo>
            <dsig:CanonicalizationMethod Algorithm="http://www.w3.org/2001/10/xml-exc-c14n#" />
            <dsig:SignatureMethod Algorithm="http://www.w3.org/2001/04/xmldsig-more#rsa-sha256" />
            <dsig:Reference URI="#ID_39aa56fc-344a-4b3b-9d7e-14bc3cbfd627">
                <dsig:Transforms>
                    <dsig:Transform Algorithm="http://www.w3.org/2000/09/xmldsig#enveloped-signature" />
                    <dsig:Transform Algorithm="http://www.w3.org/2001/10/xml-exc-c14n#" />
                </dsig:Transforms>
                <dsig:DigestMethod Algorithm="http://www.w3.org/2001/04/xmlenc#sha256" />
                <dsig:DigestValue>QBT0qhw1a3NMdmen3q9Z0Osu9H+SAM6HwxL7yuFAnf8=</dsig:DigestValue>
            </dsig:Reference>
        </dsig:SignedInfo>
        <dsig:SignatureValue>omit</dsig:SignatureValue>
        <dsig:KeyInfo>
            <dsig:KeyName>omit</dsig:KeyName>
            <dsig:X509Data>
                <dsig:X509Certificate>omit</dsig:X509Certificate>
            </dsig:X509Data>
            <dsig:KeyValue>
                <dsig:RSAKeyValue>
                    <dsig:Modulus>omit</dsig:Modulus>
                    <dsig:Exponent>AQAB</dsig:Exponent>
                </dsig:RSAKeyValue>
            </dsig:KeyValue>
        </dsig:KeyInfo>
    </dsig:Signature>
    <samlp:Status>
        <samlp:StatusCode Value="urn:oasis:names:tc:SAML:2.0:status:Success" />
    </samlp:Status>
    <saml:Assertion xmlns="urn:oasis:names:tc:SAML:2.0:assertion"
                    ID="ID_ed764108-9240-4d5a-93ff-04e65cba941c"
                    IssueInstant="2022-02-27T16:34:58.268Z"
                    Version="2.0"
                    >
        <saml:Issuer>http://192.168.10.54:8080/realms/home</saml:Issuer>
        <dsig:Signature xmlns:dsig="http://www.w3.org/2000/09/xmldsig#">
            <dsig:SignedInfo>
                <dsig:CanonicalizationMethod Algorithm="http://www.w3.org/2001/10/xml-exc-c14n#" />
                <dsig:SignatureMethod Algorithm="http://www.w3.org/2001/04/xmldsig-more#rsa-sha256" />
                <dsig:Reference URI="#ID_ed764108-9240-4d5a-93ff-04e65cba941c">
                    <dsig:Transforms>
                        <dsig:Transform Algorithm="http://www.w3.org/2000/09/xmldsig#enveloped-signature" />
                        <dsig:Transform Algorithm="http://www.w3.org/2001/10/xml-exc-c14n#" />
                    </dsig:Transforms>
                    <dsig:DigestMethod Algorithm="http://www.w3.org/2001/04/xmlenc#sha256" />
                    <dsig:DigestValue>P8xVFBFJAZ1yyR9rFcbOMc7VPvdM0pEbxm3CX3iN10c=</dsig:DigestValue>
                </dsig:Reference>
            </dsig:SignedInfo>
            <dsig:SignatureValue>omit</dsig:SignatureValue>
            <dsig:KeyInfo>
                <dsig:KeyName>omit</dsig:KeyName>
                <dsig:X509Data>
                    <dsig:X509Certificate>omit</dsig:X509Certificate>
                </dsig:X509Data>
                <dsig:KeyValue>
                    <dsig:RSAKeyValue>
                        <dsig:Modulus>omit</dsig:Modulus>
                        <dsig:Exponent>AQAB</dsig:Exponent>
                    </dsig:RSAKeyValue>
                </dsig:KeyValue>
            </dsig:KeyInfo>
        </dsig:Signature>
        <saml:Subject>
            <saml:NameID Format="urn:oasis:names:tc:SAML:2.0:nameid-format:transient">G-690c0e94-38b1-472a-b091-f4bfbf39fc11</saml:NameID>
            <saml:SubjectConfirmation Method="urn:oasis:names:tc:SAML:2.0:cm:bearer">
                <saml:SubjectConfirmationData InResponseTo="_C4D6B0831F8005708787812E9AD9D8C9"
                                              NotOnOrAfter="2022-02-27T16:39:56.268Z"
                                              Recipient="https://saml-proxy.home.lab/mellon/postResponse"
                                              />
            </saml:SubjectConfirmation>
        </saml:Subject>
        <saml:Conditions NotBefore="2022-02-27T16:34:56.268Z"
                         NotOnOrAfter="2022-02-27T16:35:56.268Z"
                         >
            <saml:AudienceRestriction>
                <saml:Audience>https://saml-proxy.home.lab/mellon/metadata</saml:Audience>
            </saml:AudienceRestriction>
        </saml:Conditions>
        <saml:AuthnStatement AuthnInstant="2022-02-27T16:34:58.268Z"
                             SessionIndex="f231b4c2-7fe9-47a0-8591-929ba5515317::01a3a5c5-9458-4d7a-a2fc-7d99f88fdc5c"
                             SessionNotOnOrAfter="2022-02-28T02:34:58.268Z"
                             >
            <saml:AuthnContext>
                <saml:AuthnContextClassRef>urn:oasis:names:tc:SAML:2.0:ac:classes:unspecified</saml:AuthnContextClassRef>
            </saml:AuthnContext>
        </saml:AuthnStatement>
        <saml:AttributeStatement>
            <saml:Attribute Name="Role"
                            NameFormat="urn:oasis:names:tc:SAML:2.0:attrname-format:basic"
                            >
                <saml:AttributeValue xmlns:xs="http://www.w3.org/2001/XMLSchema"
                                     xmlns:xsi="http://www.w3.org/2001/XMLSchema-instance"
                                     xsi:type="xs:string"
                                     >rsa_test</saml:AttributeValue>
            </saml:Attribute>
            <saml:Attribute Name="Role"
                            NameFormat="urn:oasis:names:tc:SAML:2.0:attrname-format:basic"
                            >
                <saml:AttributeValue xmlns:xs="http://www.w3.org/2001/XMLSchema"
                                     xmlns:xsi="http://www.w3.org/2001/XMLSchema-instance"
                                     xsi:type="xs:string"
                                     >default-roles-home</saml:AttributeValue>
            </saml:Attribute>
            <saml:Attribute Name="Role"
                            NameFormat="urn:oasis:names:tc:SAML:2.0:attrname-format:basic"
                            >
                <saml:AttributeValue xmlns:xs="http://www.w3.org/2001/XMLSchema"
                                     xmlns:xsi="http://www.w3.org/2001/XMLSchema-instance"
                                     xsi:type="xs:string"
                                     >manage-account</saml:AttributeValue>
            </saml:Attribute>
            <saml:Attribute Name="Role"
                            NameFormat="urn:oasis:names:tc:SAML:2.0:attrname-format:basic"
                            >
                <saml:AttributeValue xmlns:xs="http://www.w3.org/2001/XMLSchema"
                                     xmlns:xsi="http://www.w3.org/2001/XMLSchema-instance"
                                     xsi:type="xs:string"
                                     >manage-account-links</saml:AttributeValue>
            </saml:Attribute>
            <saml:Attribute Name="Role"
                            NameFormat="urn:oasis:names:tc:SAML:2.0:attrname-format:basic"
                            >
                <saml:AttributeValue xmlns:xs="http://www.w3.org/2001/XMLSchema"
                                     xmlns:xsi="http://www.w3.org/2001/XMLSchema-instance"
                                     xsi:type="xs:string"
                                     >offline_access</saml:AttributeValue>
            </saml:Attribute>
            <saml:Attribute Name="Role"
                            NameFormat="urn:oasis:names:tc:SAML:2.0:attrname-format:basic"
                            >
                <saml:AttributeValue xmlns:xs="http://www.w3.org/2001/XMLSchema"
                                     xmlns:xsi="http://www.w3.org/2001/XMLSchema-instance"
                                     xsi:type="xs:string"
                                     >uma_authorization</saml:AttributeValue>
            </saml:Attribute>
            <saml:Attribute Name="Role"
                            NameFormat="urn:oasis:names:tc:SAML:2.0:attrname-format:basic"
                            >
                <saml:AttributeValue xmlns:xs="http://www.w3.org/2001/XMLSchema"
                                     xmlns:xsi="http://www.w3.org/2001/XMLSchema-instance"
                                     xsi:type="xs:string"
                                     >view-profile</saml:AttributeValue>
            </saml:Attribute>
        </saml:AttributeStatement>
    </saml:Assertion>
</samlp:Response>
実際に商用に導入となると、パフォーマンスや可用性など考慮する点は多々ありますが、OSSを使用してSAMLの認証プロキシをたてることが確認できました。

