This article will explain how to build a router with Ubuntu20.04. This is really useful when you need a router in your home lab.
TOC
Target topology
Here is the target topology to build in this article.
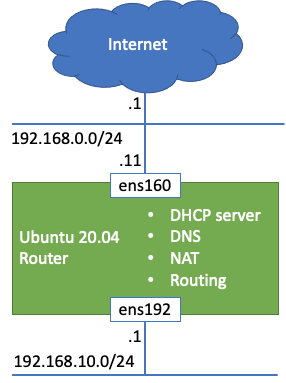
- 2 interfaces
- ens160 is for upstream connection so Ubuntu20.04 use this network to access internet.
- ens192 is for private network such as internal network in your lab.
- DHCP server for 192.168.10.0/24 network
- DNS server for 192.168.10.0/24
- NAT does SNAT for 192.168.10.0/24 network so that any devices in the network can talk to internet
- Routing between 192.168.0.0/24 and 192.168.10.0/24
Prerequisite
- Ubuntu 20.04 is installed
- Ubuntu 20.04 has 2 interfaces
- Ubuntu 20.04 has internet connectivity
Enable routing
Configure net.ipv4.ip_forward=1 in /etc/sysctl.conf
$ grep ipv4.ip_forward /etc/sysctl.conf
net.ipv4.ip_forward=1
Activate the config
sudo sysctl -pValidate the config. The output must be 1.
$ cat /proc/sys/net/ipv4/ip_forward
1
NAT configuration
Enable NAT on Ubuntu so that devices in 192.168.10.0/24 can use ens160’s ip address to access Internet. We’re going to use iptables to achieve this and also persist the configuration across reboots using iptables-persistent.
Install iptables-persistent
sudo apt install iptables-persistentAdd NAT rule
sudo iptables -t nat -A POSTROUTING -s 192.168.10.0/24 -o ens160 -j MASQUERADESave the current iptables rule to /etc/iptables/rules.v4
sudo su
iptables-save > /etc/iptables/rules.v4
DHCP server configuration
We’re going to use isc-dhcp-server to provide DHCP service in 192.168.10.0/24 network.
Install isc-dhcp-server
sudo apt install isc-dhcp-serverCreate DHCP configuration file like below. In this example, default gateway and DHS server is 192.168.10.1 which is this Ubuntu20.04.
ddns-update-style none;
default-lease-time 600;
max-lease-time 7200;
option routers 192.168.10.1;
option domain-name-servers 192.168.10.1;
option domain-name "home.lab";

subnet 192.168.10.0 netmask 255.255.255.0 {
      range 192.168.10.101 192.168.10.199;
}
Start DHCP server service and enable it so that DHCP server will start automatically after reboot
sudo systemctl enable isc-dhcp-server.service
sudo systemctl start isc-dhcp-server.service
DNS server configuration
We’re going to use BIND to configure DHS server.
Install bind9
sudo apt install bind9In this example, we’re going to achieve the following requirements.
- Accept DNS request only from 192.168.10.0/24
- Forward DHS request to google DNS,
8.8.8.8if it’s unknown. - Domain name is
home.lab. BTW,.localis not recommended because MulticastDNS use the domain - 2 DNS records for Ubuntu VM and ESXi are configured in this example.
options {
  directory "/var/cache/bind";
  listen-on port 53 { localhost; 192.168.10.0/24; };
  allow-query { localhost; 192.168.10.0/24; };
  forwarders { 8.8.8.8; };
  recursion yes;
};zone "home.lab" IN {
type master;
file "home.lab.zone";
};$TTL 86400
@ IN SOA home.lab root.home.lab (
2021050701
3600
900
604800
86400
)
@ IN NS ubuntu
ubuntu IN A 192.168.10.1
esxi1 IN A 192.168.10.11Validate configuration
named-checkconf
named-checkzone home.lab /var/cache/bind/home.lab.zone
Activate DNS service if you don’t see any errors.
sudo systemctl start named
sudo systemctl enable named