Mat Tableにソートヘッダーとフッター(合計行)をつけたときのメモです。
Material UIのプロジェクトの作成は下記の記事を参考にしてください。
 Angular Materialを使ったプロジェクトの作成
TOC
Mat Tableのサンプルを移植する
Tableの例のページからフッター付きのコードを移植します。
参考 Table ExamplesHTMLコードをapp.component.htmlにコピペします。
<table mat-table [dataSource]="transactions" class="mat-elevation-z8">
  <!-- Item Column -->
  <ng-container matColumnDef="item">
    <th mat-header-cell *matHeaderCellDef> Item </th>
    <td mat-cell *matCellDef="let transaction"> {{transaction.item}} </td>
    <td mat-footer-cell *matFooterCellDef> Total </td>
  </ng-container>

  <!-- Cost Column -->
  <ng-container matColumnDef="cost">
    <th mat-header-cell *matHeaderCellDef> Cost </th>
    <td mat-cell *matCellDef="let transaction"> {{transaction.cost | currency}} </td>
    <td mat-footer-cell *matFooterCellDef> {{getTotalCost() | currency}} </td>
  </ng-container>

  <tr mat-header-row *matHeaderRowDef="displayedColumns"></tr>
  <tr mat-row *matRowDef="let row; columns: displayedColumns;"></tr>
  <tr mat-footer-row *matFooterRowDef="displayedColumns"></tr>
</table>続いて、それに合うようにapp.component.tsを変更。
import { Component } from '@angular/core';

interface Transaction {
  item: string;
  cost: number;
}

@Component({
  selector: 'app-root',
  templateUrl: './app.component.html',
  styleUrls: ['./app.component.scss']
})
export class AppComponent {
  title = 'angular-material-ui-samples';
  displayedColumns: string[] = ['item', 'cost'];
  transactions: Transaction[] = [
    {item: 'Beach ball', cost: 4},
    {item: 'Towel', cost: 5},
    {item: 'Frisbee', cost: 2},
    {item: 'Sunscreen', cost: 4},
    {item: 'Cooler', cost: 25},
    {item: 'Swim suit', cost: 15},
  ];

  /** Gets the total cost of all transactions. */
  getTotalCost() {
    return this.transactions.map(t => t.cost).reduce((acc, value) => acc + value, 0);
  }
}テーブルの見た目のためにapp.component.scssに下記を追加します。
table {
  width: 100%;
}

tr.mat-footer-row {
  font-weight: bold;
}
これにてフッター付きのテーブルは完成です。
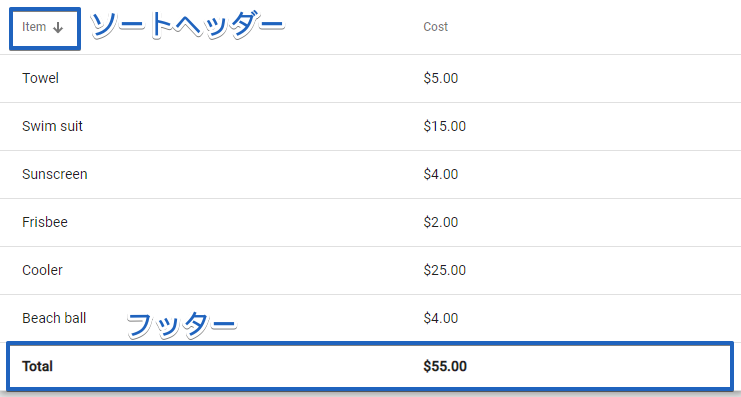
フッター行について
例を見ていただくとわかるように各列のフッターの値に何を入れるかはHTML内で指定しています。
Itemという列のフッターはTotalという内容になっています。
  <ng-container matColumnDef="item">
    <th mat-header-cell *matHeaderCellDef> Item </th>
    <td mat-cell *matCellDef="let transaction"> {{transaction.item}} </td>
    <td mat-footer-cell *matFooterCellDef> Total </td>
</ng-container>Costという列のフッターは{{getTotalCost() | currency}}となっており、TypescriptのgetTotalCost()関数の返り値を表示するようになっています。
  <ng-container matColumnDef="cost">
    <th mat-header-cell *matHeaderCellDef> Cost </th>
    <td mat-cell *matCellDef="let transaction"> {{transaction.cost | currency}} </td>
    <td mat-footer-cell *matFooterCellDef> {{getTotalCost() | currency}} </td>
  </ng-container>
固定の値であれば、HTMLに直で入力していただいても大丈夫です。動的な値を入れるには、Typescript側で計算を実施し、その結果を表示するように変数や関数を利用します。
ソートヘッダーの追加
ソートヘッダーを実装します。同様にソートを実装しているテーブルの例から必要な部分をコピーしていきます。
HTMLファイルでは、tableにmatSortのプロパティを追加し、ソートさせたいヘッダーにmat-sort-headerを追加します。また、ソートを実装するためにMatTableDataSourceクラスを使用するため、dataSourceをtransactionsからdataSourceという変数に変更します。
<table mat-table [dataSource]="dataSource" class="mat-elevation-z8" matSort>
  <!-- Item Column -->
  <ng-container matColumnDef="item">
    <th mat-header-cell *matHeaderCellDef mat-sort-header> Item </th>
    <td mat-cell *matCellDef="let transaction"> {{transaction.item}} </td>
    <td mat-footer-cell *matFooterCellDef> Total </td>
  </ng-container>

  <!-- Cost Column -->
  <ng-container matColumnDef="cost">
    <th mat-header-cell *matHeaderCellDef> Cost </th>
    <td mat-cell *matCellDef="let transaction"> {{transaction.cost | currency}} </td>
    <td mat-footer-cell *matFooterCellDef> {{getTotalCost() | currency}} </td>
  </ng-container>

  <tr mat-header-row *matHeaderRowDef="displayedColumns"></tr>
  <tr mat-row *matRowDef="let row; columns: displayedColumns;"></tr>
  <tr mat-footer-row *matFooterRowDef="displayedColumns"></tr>
</table>
続いて、TSファイルにsort用のコードを追加します。まとめると最終的なTSファイルは以下のようになります。
import { AfterViewInit, Component, ViewChild } from '@angular/core';
import { MatSort } from '@angular/material/sort';
import { MatTableDataSource } from '@angular/material/table';

interface Transaction {
  item: string;
  cost: number;
}

@Component({
  selector: 'app-root',
  templateUrl: './app.component.html',
  styleUrls: ['./app.component.scss']
})
export class AppComponent implements AfterViewInit{
  title = 'angular-material-ui-samples';
  displayedColumns: string[] = ['item', 'cost'];
  transactions: Transaction[] = [
    {item: 'Beach ball', cost: 4},
    {item: 'Towel', cost: 5},
    {item: 'Frisbee', cost: 2},
    {item: 'Sunscreen', cost: 4},
    {item: 'Cooler', cost: 25},
    {item: 'Swim suit', cost: 15},
  ];

  dataSource: MatTableDataSource<Transaction>;
  @ViewChild(MatSort, { static: false}) sort!: MatSort;

  constructor(){
    this.dataSource = new MatTableDataSource(this.transactions);
  }

  ngAfterViewInit() {
    this.dataSource.sort = this.sort;
  }

  /** Gets the total cost of all transactions. */
  getTotalCost() {
    return this.transactions.map(t => t.cost).reduce((acc, value) => acc + value, 0);
  }
}
変更点は下記の2点です。
- MatTableDataSourceの利用
- MatSortのコードを追加
サンプルだとsortの定義では
@ViewChild(MatSort) sort: MatSort;
となっていますが、
Error: src/app/app.component.ts:28:41 - error TS2564: Property 'sort' has no initializer and is not definitely assigned in the constructor.

28   @ViewChild(MatSort) sort: MatSort;
とエラーが出てしまいますのでnon-nullであることを明示するために! (Non-null assertion operator)を追加し、以下のようにしました。
@ViewChild(MatSort, { static: false}) sort!: MatSort;
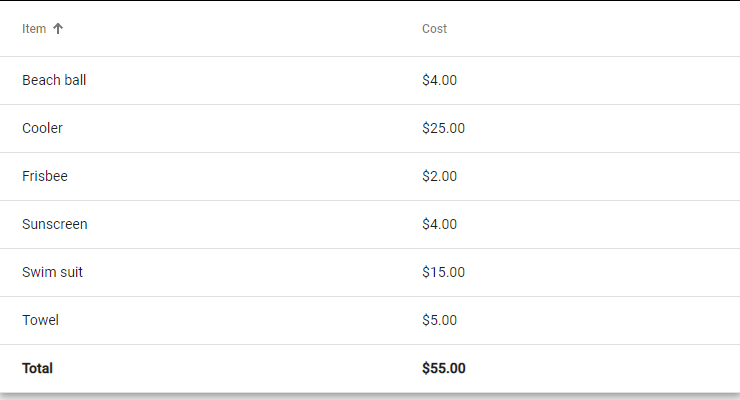
以上となります。適切に設定されていればヘッダーをクリックすることで
- 元の並び
- 昇順
- 降順
の3種類でテーブルが並び替えられるはずです。